
Side Dishes
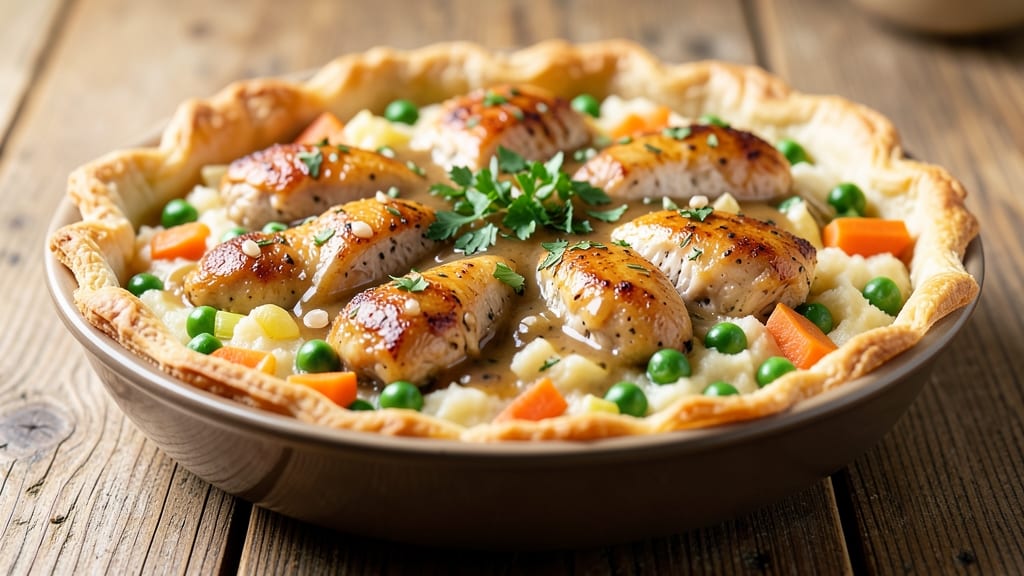
This baked chicken pot pie cobbler recipe delivers the ultimate one-dish comfort food experience—juicy chicken, creamy filling, and a golden, crispy cobbler top that's impossible to resist. 💛 I designed this recipe to combine the hearty satisfaction of pot pie with the rustic charm of a Southern cobbler, creating something that's both nostalgic and elevated.
The secret lies in the layered approach: tender chicken simmered in a rich, savory sauce, then topped with a buttery, flaky crust that bakes to perfect crispness.
The beauty of this dish is its simplicity—just one baking dish, minimal prep, and a single baking time. I use a combination of biscuit dough and pie crust for the topping, which gives you that signature cobbler texture while still maintaining the structural integrity of a classic pie crust.
The filling is where the magic happens: chicken thighs (not breasts) stay juicy, while vegetables like carrots and peas add natural sweetness that balances the savory sauce. This recipe is perfect for weeknight dinners when you want something hearty but don't have time for complicated techniques.
What you'll end up with is a dish that looks impressive but comes together effortlessly—a bubbling, golden cobbler top with flaky layers that contrast beautifully against the creamy filling below.
The aroma alone will have everyone gathered around your table, and each bite delivers that perfect balance of crispy, creamy, and savory. The best part? Leftovers reheat beautifully, making this an ideal meal prep option for busy families.
Serve with a simple side salad or steamed green beans to round out the meal, but honestly, this cobbler is hearty enough to stand alone. The technique is foolproof, and the results are restaurant-quality without requiring any special skills. Let's get started on creating your new favorite one-dish wonder!
Ingredients for baked chicken pot pie cobbler
Juicy chicken thighs, sweet carrots, and a golden cobbler top—this one-dish wonder has it all.
| Ingredient | Amount | Notes |
|---|---|---|
| Chicken Thighs, Bone-In 🍗 | 1 ½ lb | Skin-on preferred for crispiness |
| Carrots, Medium 🥕 | 2 whole | Peeled, sliced into rounds |
| Frozen Peas 🌱 | ½ cup | No need to thaw |
| Yellow Onion 🧅 | 1 whole | Diced, medium size |
| Celery Stalks 🌿 | 2 whole | Diced, fresh preferred |
| Garlic Cloves 🧄 | 3 cloves | Minced, fresh preferred |
| All-Purpose Flour 🌾 | ½ cup | For thickening sauce |
| Chicken Broth 💧 | 1 ½ cups | Low-sodium preferred |
| Heavy Cream 🥛 | ½ cup | Full-fat for richness |
| Unsalted Butter 🧈 | ½ cup | Cold, cubed for crust |
| Biscuit Dough 🍞 | 1 box | Refrigerated, like Pillsbury |
| Pie Crust 🥧 | 1 sheet | Store-bought or homemade |
| Sharp Cheddar Cheese 🧀 | ½ cup | Shredded, sharp flavor |
| Dried Thyme 🌿 | 1 tsp | Or 1 tbsp fresh |
| Ground Black Pepper 🌶️ | ½ tsp | Freshly ground preferred |
| Salt 🧂 | 1 ½ tsp | Kosher or sea salt |
The chicken thighs are non-negotiable here—they stay juicy while the breasts would dry out. Look for bone-in, skin-on thighs at the grocery store; they add extra flavor and crispiness. If you're at Whole Foods or a specialty butcher, ask for the highest-quality cuts. The carrots and peas add natural sweetness that balances the savory filling—frozen peas work perfectly, no need to thaw. For the onions and celery, I always buy the freshest I can find (the good stuff, not the pre-chopped kind), because they're the base of the flavor. The garlic? Fresh is a must—it makes all the difference in that rich, savory sauce.
No chicken thighs? Substitute bone-in chicken drumsticks for a similar texture. Short on carrots? Sweet potatoes work beautifully—just adjust the cooking time slightly. The biscuit dough and pie crust can be swapped for a single homemade biscuit dough if you're feeling ambitious, but store-bought is totally fine. For the cheese, sharp cheddar is ideal, but Gruyère or Gouda add a delicious twist. If you're out of thyme, dried oregano at half the amount gets you close. The heavy cream is where the richness comes from—don't use light cream or half-and-half; trust me on the full-fat version.
The biscuit dough and pie crust keep best in the fridge, so pull them out 30 minutes before using to let them soften. The chicken thighs can be prepped ahead and refrigerated for 2 days before baking. Once baked, this cobbler reheats beautifully—just cover with foil and warm in the oven for 15-20 minutes. It also freezes wonderfully: wrap tightly and store for up to 3 months. I always make a double batch because it disappears fast—perfect for meal prep or feeding a crowd.
Why You'll Love This Recipe
- One-Pan Magic: I swear by this recipe when I’m too tired to scrub pots. Bone-in chicken thighs brown beautifully alongside the onions and celery, then the carrots and peas melt into the creamy filling—all while the biscuit topping puffs up golden. Just dump, bake, and let the oven do the work.
- Rich, Homestyle Flavor: That crispy biscuit crust over tender chicken and veggies? It’s the kind of dish that tastes like your grandma’s kitchen, but with a shortcut. The bone-in thighs add depth, and the frozen peas (yes, frozen!) bring that bright pop of green that makes every bite feel special.
- Weeknight & Meal Prep Hero: Between us, this is my go-to for busy nights—it’s hearty enough for dinner but simple enough to prep ahead. Double the batch, freeze half, and you’ve got a ready-to-bake meal for when life gets chaotic. (Yes, even on a Tuesday night.)
- Budget-Friendly Feast: Bone-in chicken thighs stretch further than breasts, and frozen peas cut costs without sacrificing taste. The veggies are basic but do the job perfectly, making this a reliable, wallet-friendly dish that still feels indulgent. Leftovers? Even better the next day.
Step-by-step instructions for baked chicken pot pie cobbler
Here's how to create a comforting, one-dish wonder with tender chicken and a golden, flaky crust.
🍳 Step 1: Sear the Chicken and Sauté Vegetables
Preheat your oven to 400°F. Heat a large oven-safe skillet over medium-high heat and add the 1.5 lb chicken thighs, skin-side down. Let them sear for 5-6 minutes until golden brown and crispy. Flip and cook another 3-4 minutes until no longer pink in the center. Remove and set aside.
In the same skillet, add 0.5 cup unsalted butter and melt over medium heat. Add the 1 whole yellow onion and 2 whole celery stalks, cooking for 5 minutes until softened. Stir in the 2 whole carrots and 3 cloves garlic cloves, cooking another 3 minutes until fragrant. Sprinkle with 1 tsp dried thyme, 0.5 tsp ground black pepper, and 1 tsp salt.
🥘 Step 2: Build the Savory Filling
Return the seared chicken to the skillet and add 1.5 cups chicken broth and 0.5 cup heavy cream. Stir in 0.5 cup all-purpose flour and cook for 2-3 minutes until slightly thickened. Add the 0.5 cup frozen peas and 0.5 cup sharp cheddar cheese, stirring until melted and creamy. Taste and adjust seasoning if needed.
Here's where the magic happens: the sauce should coat the back of a spoon but still be pourable. If it's too thick, add 1-2 tablespoons of broth to loosen it. The filling should be rich, savory, and just thick enough to hold its shape when spooned.
🔥 Step 3: Assemble and Bake the Cobbler
Roll out the 1 sheet pie crust on a floured surface and cut it to fit the top of your skillet, leaving a slight overhang. Gently place it over the filling, tucking the edges slightly inward. Cut the 1 box biscuit dough into 8 pieces and arrange them on top of the pie crust in a circular pattern, like a wheel.
Bake for 25-30 minutes until the crust is deep golden brown and the filling is bubbling at the edges. The biscuit topping should be puffed and crispy—this is your crispy promise delivered! If the crust starts browning too quickly, tent loosely with foil.
⏰ Step 4: Rest and Serve
Remove from the oven and let the cobbler rest for 10 minutes before serving. This resting time allows the filling to set slightly and the juices to redistribute, ensuring every bite is moist and flavorful. The contrast between the crispy biscuit top and creamy filling is what makes this dish irresistible.
Serve warm with a side of steamed green beans or a simple salad. Each forkful delivers tender chicken, creamy vegetables, and that perfect crunch from the biscuit crust—all in one delicious bite! The secret to success? Don't skip the resting time; it's what transforms good into extraordinary.
Pro Tips For Making Baked Chicken Pot Pie Cobbler
- Brown the Chicken First: Skip the "quick sear" myth—get those bone-in thighs deep golden on all sides before adding liquid. I used to rush this, and the final dish always tasted undercooked. Five minutes per side in a hot skillet with a splash of broth makes the difference between soggy and juicy.
- Dice the Onion Small: Tiny dice (1/8-inch or less) cooks faster and blends into the filling without texture clashes. I learned this the hard way when my first batch had visible onion chunks—now I slice through the root end first for consistency.
- Thaw Peas in Hot Filling: Dump frozen peas straight into the simmering chicken mixture—they’ll thaw and absorb flavor in minutes. No need to pre-thaw; just stir them in during the last 5 minutes of cooking. (Yes, even if you’re impatient like me.)
- Vent the Dough Early: Poke a few holes in the biscuit topping before baking to let steam escape—this prevents a gummy crust. I skip this sometimes, and the result is a sad, dense lid instead of a flaky, golden finish. Two quick snips with a knife is all it takes.
Storing and reheating your baked chicken pot pie cobbler
Refrigerator Storage
Your baked chicken pot pie cobbler stays fresh in the fridge for up to 4 days when stored properly. Let it cool completely, then transfer to an airtight container with a lid—glass works best for even reheating.
The filling actually deepens in flavor overnight, so leftovers often taste even better the next day. 💛
For best texture, reheat portions in a lightly oiled baking dish covered with foil at 350°F for 15-20 minutes. This method prevents drying while restoring that golden crust. I always reheat mine until the biscuit topping is crispy again—it's the key to restaurant-quality leftovers.
Freezer Prep
This cobbler freezes beautifully for up to 3 months—perfect for meal prep. After baking, let it cool completely, then wrap tightly in plastic wrap followed by foil to prevent freezer burn. Label with the date to track freshness. When ready to eat, thaw overnight in the fridge before reheating.
For quick meals, I often freeze individual servings in single-portion containers. Just pop one in the oven while you're getting ready for work—it'll be ready when you are. The texture holds up remarkably well, though the crust may lose just a touch of crispness.
Microwave Shortcuts
When time is tight, use the microwave for quick reheating—just cover with a damp paper towel and heat in 30-second intervals on medium power. Stir between intervals to distribute heat evenly. This method works best for the filling but won't restore the biscuit crust's crispiness. 🌡️
For best results, I recommend the oven method for full flavor restoration, but the microwave is a great backup when you're in a hurry. The filling stays creamy and delicious either way—just don't expect that perfect cobbler crunch from the microwave alone.
Make-Ahead Tips
Prep the filling ahead of time and store it in the fridge for up to 2 days before baking. This is a game-changer for busy weeknights—I often make the filling the night before, then assemble and bake in the morning. The flavors meld beautifully overnight.
For the ultimate time-saver, assemble the entire cobbler (up to the biscuit topping) and refrigerate for 8 hours or overnight. When ready to bake, just add the biscuit pieces and pop it in the oven. The cold filling helps create extra crispiness on the crust.
Nutrition facts
Frequently asked questions
Can I make this recipe with chicken breasts instead of thighs?
I don't recommend it! Chicken breasts are much leaner and can dry out during the long baking time. If you must use breasts, cut them into small pieces and bake for only 20-25 minutes total to prevent toughness. For best results, stick with bone-in thighs—they stay juicy and crispy, just like in this recipe.
How do I get the biscuit topping extra crispy?
For that perfect cobbler crunch, chill the biscuit dough pieces for 15 minutes before baking. Brush them lightly with melted butter before placing on top, and bake at 400°F until golden brown. The high heat is key—don't be tempted to lower the temperature!
Can I make this in a regular baking dish instead of a skillet?
Transfer the filling to a 9x13-inch baking dish and proceed with the same topping assembly. Bake at 400°F for 35-40 minutes instead of 25-30, as the larger surface area takes longer to crisp. The flavor will be just as rich—it's all about the technique!
What if I don't have pie crust or biscuit dough?
No problem! For a quick crust, mix 1 cup flour, ½ cup cold butter, and 2 tablespoons ice water until crumbly. Press over the filling and bake as directed. For the biscuit topping, try cornbread batter or even crushed Ritz crackers mixed with butter for a crunchy alternative.
Why did my filling get watery after baking?
This usually happens when the sauce isn't thickened enough before baking.