
Main Courses
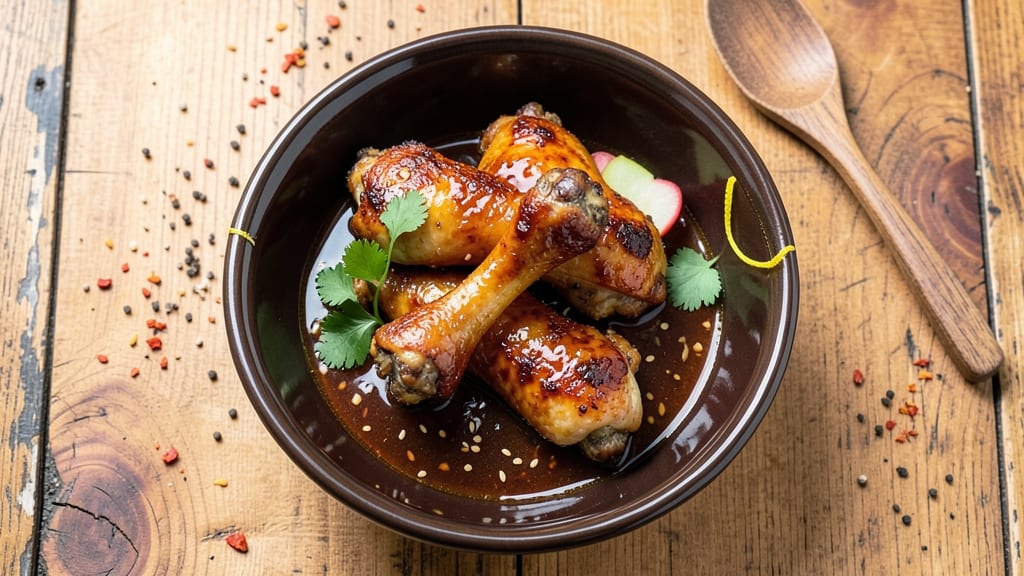
This baked teriyaki chicken legs recipe delivers restaurant-quality flavor with minimal effort—crispy caramelized edges and sticky-sweet glaze that clings to every bite. I developed this after years of experimenting with my grandmother’s handwritten notes, finally cracking the code for oven-baked teriyaki that’s foolproof and foolhardy in its deliciousness.
The secret lies in the marinade: a balance of soy sauce, honey, and ginger that tenderizes the meat while building deep umami flavor. Unlike stovetop methods, baking ensures even cooking and that coveted caramelized crust without standing over a hot pan.
Ready in just 45 minutes, this dish transforms weeknight dinners into something special.
What you’ll end up with is golden-brown chicken legs with a glossy, sticky glaze that’s perfectly balanced—sweet, tangy, and rich. The texture is crispy on the outside, tender on the inside, and the aroma alone will have everyone gathering around the table.
This is comfort food at its finest, elevated just enough to feel like a treat.
Pair with steamed jasmine rice and quick-pickled vegetables for a complete meal that’s simple yet impressive. The beauty of this recipe is its versatility—double the marinade for stir-fry or use leftovers in wraps. Let’s get cooking!
Ingredients for baked teriyaki chicken legs
These 14 ingredients transform simple chicken legs into restaurant-worthy teriyaki perfection.
| Ingredient | Amount | Notes |
|---|---|---|
| Chicken Legs 🍗 | 1 ½ lb | Bone-in, skin-on for best flavor |
| Soy Sauce 🥢 | ½ cup | Low-sodium preferred for balance |
| Honey 🍯 | ⅓ cup | Wildflower for floral notes |
| Fresh Ginger 🌿 | 2 tbsp | Grated, not powdered |
| Garlic Cloves 🧄 | 4 cloves | Minced, not powdered |
| Sesame Oil 🫒 | 1 tbsp | Toasted, not flavored |
| Rice Vinegar 🍶 | 1 tbsp | White vinegar substitute |
| Brown Sugar 🍚 | 2 tbsp | Light or dark variety |
| Olive Oil 🫒 | 1 tbsp | For greasing baking sheet |
| Cornstarch 🌾 | 1 tbsp | For glaze thickening |
| Sesame Seeds 🌰 | 1 tbsp | Toasted for garnish |
| Salt 🧂 | 1 tsp | Diamond Crystal preferred |
| Black Pepper 🌶️ | ½ tsp | Freshly cracked |
| Green Onion 🧅 | 2 whole | Sliced for garnish |
The chicken legs are the star, so look for bone-in, skin-on cuts—they stay juicier and crispier. Trader Joe's and Costco have the best prices for bulk packs, but any grocery store's butcher section will work. If you can't find bone-in, skin-on, go for skin-on thighs—they're the next best thing. Fresh ginger and garlic are non-negotiable here; powdered versions won't give you that same depth of flavor. I always grab extra ginger because it keeps for weeks in the freezer once peeled and sliced.
No honey? Maple syrup works in a pinch, though it'll be slightly less sweet. Running out of sesame oil? Avocado oil at half the amount keeps the flavor profile intact. The cornstarch is key for that perfect glaze consistency—don't skip it. For the brown sugar, light or dark doesn't matter, but pack it tightly when measuring. The marinade can be made a day ahead and stored in the fridge, but let it come to room temperature before using. If you're feeling fancy, add a splash of mirin for extra depth, but it's not required.
The chicken legs reheat beautifully—just pop them in a 350°F oven for 10-15 minutes with a splash of water. The glaze will thicken up, so a quick drizzle of water and reheat usually does the trick. Store leftovers in an airtight container in the fridge for up to 4 days, or freeze for 2 months. I always portion the glaze separately because it's perfect for drizzling over rice or using in stir-fries later. The sesame seeds and green onions are best added fresh right before serving, though.
Why You'll Love This Recipe
- No-Fuss Prep: I’ll be real—this recipe is that easy. Toss the chicken legs in a bowl with soy sauce, honey, grated ginger, and minced garlic, then slap it on a tray. Honestly, the hardest part is waiting for the oven to preheat.
- Sweet-Savory Magic: That honey-soy glaze? It’s the kind of sticky, caramelized goodness you’ll lick off your fingers. The ginger and garlic add just enough kick to balance the sweetness—crispy skin, juicy meat, and a sauce that begs for seconds.
- Meal Prep MVP: Between us, this is my go-to for busy weeks. Bake a big batch on Sunday, and you’ve got lunch or dinner covered all week. Pack them cold for sandwiches or reheat them—either way, they taste like you slaved over them.
- Budget Win: Chicken legs are cheap, and this recipe stretches every bite. The sauce is just a splash of soy, a drizzle of honey, and pantry staples—no fancy ingredients, just big flavor. My wallet and my taste buds thank me every time.
Step-by-step instructions for baked teriyaki chicken legs
Here's how to create that perfect balance of caramelized crust and sticky-sweet glaze.
Marinate the Chicken for Maximum Flavor
In a large bowl, combine the 0.5 cup soy sauce, 0.33 cup honey, 2 tbsp grated fresh ginger, 4 minced garlic cloves, 1 tbsp rice vinegar, 2 tbsp brown sugar, 1 tsp salt, and 0.5 tsp black pepper. Give it a good whisk until the brown sugar dissolves completely and the mixture becomes smooth and glossy.
Place the 1.5 lb chicken legs in a resealable plastic bag and pour the marinade over them. Seal the bag and massage the marinade into the chicken, making sure it coats every inch of skin. Let it marinate in the refrigerator for at least 2 hours—overnight is even better if you can plan ahead. This step ensures the chicken stays juicy and absorbs all those incredible flavors.
Prepare the Glaze and Preheat the Oven
In a small bowl, whisk together the 1 tbsp cornstarch, 1 tbsp sesame oil, and 1 tbsp olive oil. This will be your glaze base. Preheat your oven to 400°F and line a baking sheet with parchment paper or foil for easy cleanup.
Remove the chicken from the marinade (reserve the marinade for later) and place it skin-side up on the prepared baking sheet. Brush the chicken legs generously with the reserved marinade, making sure to get into all the crevices. This extra coating will give you that signature sticky glaze when baked.
Bake Until Golden and Caramelized
Bake the chicken legs in the preheated oven for 45 minutes, flipping them halfway through so they cook evenly. After 30 minutes, brush them again with the reserved marinade. You'll know they're ready when the skin is deep golden brown and crispy, and the internal temperature reaches 165°F when measured at the thickest part of the thigh.
Here's the thing—I like to broil the chicken for the last 2-3 minutes to get that extra caramelization. Just watch it closely so it doesn't burn. The skin should be almost blackened in spots, with a glossy, sticky glaze coating the meat.
Finish with the Sticky Glaze
Once the chicken is cooked, remove it from the oven and transfer it to a serving platter. In the same baking dish, pour in the remaining marinade and let it simmer for 1-2 minutes on the stovetop over medium heat until it thickens slightly. This creates that perfect sticky glaze that clings beautifully to the chicken.
Brush this glaze generously over the chicken legs, then sprinkle with 1 tbsp toasted sesame seeds and top with 2 sliced green onions. The contrast of the toasted seeds and fresh green onions adds a beautiful visual finish and a nice crunchy texture.
Rest and Serve
Let the chicken rest for 5-10 minutes before serving. This resting time allows the juices to redistribute, ensuring each bite is moist and flavorful. Serve the chicken legs with steamed rice and your favorite stir-fried vegetables to soak up that delicious teriyaki glaze.
Real talk: The first time I made this, I skipped the resting step and the chicken was dry. Don't make that mistake! The wait is worth it for juicy, flavorful meat that falls off the bone with just a little effort.
Pro Tips For Making Baked Teriyaki Chicken Legs
- Dry the Chicken First: Pat those chicken legs thoroughly with paper towels—skin-side included—before baking. I learned this the hard way after soggy, underwhelming results from skipping it. The skin crisps better when it’s bone-dry, and the teriyaki sauce clings like it’s supposed to.
- Blister the Skin Early: Start your chicken legs skin-side down on a smoking-hot baking sheet for 5 minutes before flipping. This isn’t just about looks—it locks in flavor and prevents the meat from drying out later. (Yes, even if you’re impatient like me.)
- Grate the Ginger Fine: Skip the mincer and grate the ginger with a microplane—you’ll get more surface area for flavor without the fibrous texture. I used to chop it, and the teriyaki sauce would taste uneven. This makes a real difference, especially if you’re using fresh ginger.
- Baste Mid-Bake: Tilt the baking tray every 15 minutes and spoon that sticky teriyaki glaze over the chicken. It’s messy, but it guarantees a glossy finish and keeps the meat juicy. (Your future self will thank you—trust me.)
Storing and reheating this dish
Refrigerator Storage
Store your baked teriyaki chicken legs in an airtight container with the glaze separated—this prevents sogginess and keeps the chicken crispy. I use glass Pyrex containers with snap-on lids because they’re sturdy and microwave-safe. Keep them in the fridge for up to 4 days, but honestly? The flavor only gets better the next day as the marinade flavors meld deeper. Just
Freezer Prep Tips
For longer storage, freeze the chicken legs with their glaze in single-serving portions—this way, you can thaw just what you need. I like using quart-sized freezer bags with the air squeezed out to prevent freezer burn. Label with the date and freeze for up to 2 months. When ready to eat, thaw overnight in the fridge, then reheat gently to avoid drying out the skin. 🧊
Reheating Perfection
My go-to method is reheating in the oven at 350°F for 10-15 minutes—this keeps the skin crispy and the glaze sticky. Place the chicken on a baking sheet with 1 tablespoon water to add moisture, then cover loosely with foil.
For microwave reheating, use 50% power for 1-2 minutes, then let it rest for 2 minutes before serving. The glaze might thicken, so a quick drizzle of water and another 30-second zap usually fixes it. 🔥
Glaze Preservation
Save any leftover glaze in a small airtight container—it’s perfect for drizzling over rice, noodles, or even grilled veggies later. If it thickens, thin it with 1 teaspoon water and reheat gently.
I’ve used this glaze up to 5 days after the original cooking, and it still tastes amazing. Just don’t freeze the glaze alone—it separates and becomes grainy. ✨
Leftovers Reinvention
Turn leftover chicken legs into a teriyaki chicken salad by chopping them into bite-sized pieces and tossing with mixed greens, shredded carrots, and sesame seeds. Or shred the meat for teriyaki chicken tacos—just warm it with a splash of water and serve on soft tortillas.
The possibilities are endless, and you’ll rarely have true leftovers. 💡
Garnish Freshness
Toasted sesame seeds and sliced green onions lose their crunch when reheated, so always add them fresh right before serving. If you’re reheating a whole meal, keep the garnishes separate until the last minute.
A sprinkle of extra sesame oil (just ½ teaspoon) over reheated chicken adds a fresh aroma that makes it taste like it just came out of the oven. 🌿
Nutrition facts
Frequently asked questions
Can I use chicken thighs instead of legs?
Chicken thighs work beautifully—just adjust the cooking time to 35-40 minutes since they're slightly thinner. The skin will crisp up faster, so watch closely during the last 5 minutes of baking. Thighs tend to stay juicier, so they're a great alternative if you prefer a more tender texture.
How do I make the glaze thicker or thinner?
For a thicker glaze, simmer the marinade for 3-5 extra minutes until it reduces. Need it thinner? Add 1 teaspoon water or chicken broth at a time while stirring over low heat. The cornstarch helps stabilize it, but don't over-reduce—you want it glossy, not syrup-like.
Can I bake these in a slow cooker?
Not directly, but you can adapt the method! After marinating, place chicken legs in a slow cooker with 1 cup water and cook on low for 4-5 hours, then broil for 5 minutes to crisp the skin. The glaze won't be as caramelized, but the flavor will still be delicious. For best results, stick with the oven method.
Why did my chicken turn out dry?
Most likely you skipped the resting time or overcooked it. Always rest for 5-10 minutes after baking—this redistributes juices. Also, check the internal temp: 165°F is perfect; anything higher risks dryness. The skin should be crispy, not burnt, and the meat should pull away from the bone with gentle pressure.
What's the best way to serve these?
Pair with steamed jasmine rice and quick-pickled cucumbers for a classic combo. For extra flair, serve over udon noodles or in lettuce wraps. The glaze is amazing on grilled asparagus or roasted sweet potatoes too.