
Main Courses
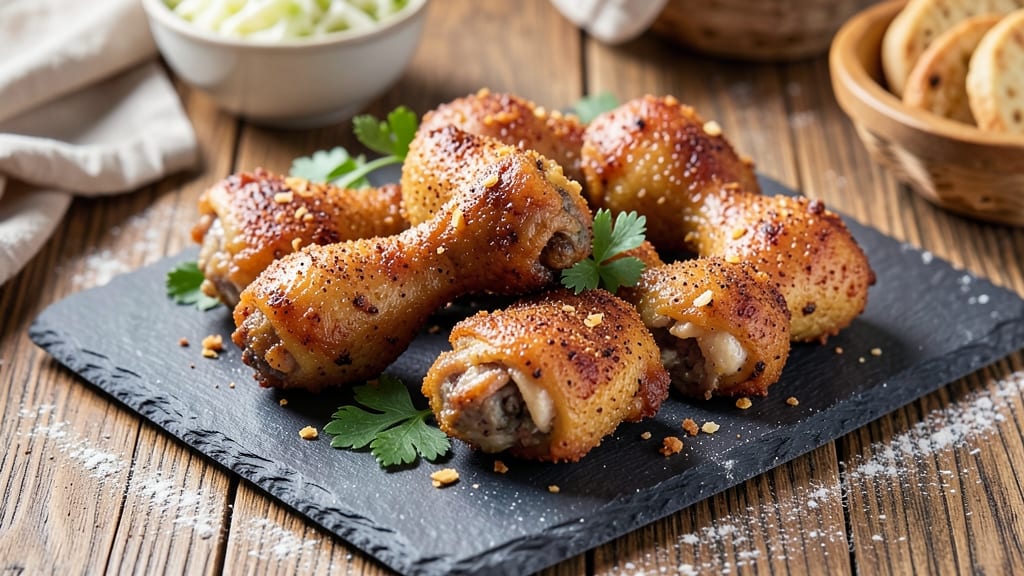
This oven-baked fried chicken drumsticks recipe delivers restaurant-quality crispiness without deep-frying—just juicy, golden-brown perfection every time. 🔥 I perfected this after years of trial and error (and one particularly greasy kitchen disaster), and it's now my go-to for weeknight dinners that taste like Sunday supper.
The secret? A two-step baking method that creates a crispy crust while keeping the meat tender inside.
The process is simpler than you'd think: drumsticks get coated in a flavor-packed seasoning blend, then a light, crispy breading that stays crunchy even after baking. No frying required—just a hot oven and a little patience.
I've tested this with different cuts and seasonings, and this version consistently delivers that crunchy exterior and moist interior that makes fried chicken irresistible.
What makes this recipe stand out is the foolproof technique for achieving crispy skin without drying out the meat. The high-heat baking method ensures the breading gets golden and crunchy, while the internal temperature stays perfect.
By the time these drumsticks come out of the oven, they'll be shatteringly crisp on the outside and tender all the way through—no soggy or overcooked results here.
Serve these with classic sides like mashed potatoes, coleslaw, or a tangy dipping sauce. The best part? You can make a full batch ahead of time and reheat them in the oven to keep that crispy texture intact. Let's get started!
Ingredients for best oven baked fried chicken drumsticks
Juicy drumsticks meet crispy perfection—no deep-fryer needed. These ingredients deliver restaurant-quality flavor right in your oven.
| Ingredient | Amount | Notes |
|---|---|---|
| Chicken Drumsticks 🍗 | 1 ½ lb | Bone-in, skin-on for best flavor |
| All-Purpose Flour 🌾 | 1 cup | For light, crispy breading |
| Cornstarch 🌾 | ½ cup | Extra crunch and crispiness |
| Paprika 🌶️ | 2 tbsp | Smoked for deep flavor |
| Garlic Powder 🧄 | 1 tbsp | Freshly ground preferred |
| Onion Powder 🧅 | 1 tbsp | For aromatic depth |
| Salt 🧂 | 1 ½ tsp | Diamond Crystal preferred |
| Black Pepper 🌶️ | 1 tsp | Freshly cracked for heat |
| Cayenne Pepper 🔥 | ½ tsp | Adjust for heat preference |
| Large Eggs 🥚 | 1 whole | Room temperature for even coating |
| Buttermilk 🥛 | ½ cup | Homemade or store-bought |
| Olive Oil 🫒 | 2 tbsp | Light and neutral flavor |
The drumsticks are non-negotiable here—bone-in, skin-on for that classic fried chicken texture. Look for uniform-sized drumsticks at Costco or your local butcher for even cooking. If you can't find them fresh, frozen works too (thaw in the fridge overnight). The secret to crispiness? Cornstarch—it's what makes these drumsticks shatteringly crunchy without frying. For the spices, Penzeys or bulk bins at natural grocery stores give the best flavor punch. Smoked paprika adds that signature depth, while cayenne gives a subtle kick—adjust to taste.
No buttermilk? Plain yogurt thinned with milk works in a pinch—just add a splash of lemon juice or vinegar. Freshly cracked black pepper makes all the difference, but pre-ground is fine if you're in a hurry. Want extra crunch? Add 1/4 cup crushed cornflakes to the flour mix. The olive oil is key for that golden-brown crust—use light or extra-virgin (avoid heavily flavored oils). For a spicier kick, swap cayenne for red pepper flakes at the same amount. And if you're feeling fancy, add 1 tsp of Cajun seasoning to the flour mix for a Southern twist.
Prep ahead for maximum crispiness: Marinate the drumsticks in buttermilk for 2-4 hours (or overnight) before coating—they'll stay juicier. Store the dry seasoning mix in an airtight container for up to 3 months—it's perfect for future batches. Once baked, these drumsticks reheat beautifully: 5 minutes at 375°F on a wire rack keeps that crispy texture. Serve immediately for the best crunch, or store in the fridge for up to 3 days (reheat in the oven to restore crispiness). Freeze uncooked drumsticks for 3 months—just thaw and bake as directed.
Why You'll Love This Recipe
- No-Fry Hassle: I swear by this recipe because it gives you that golden, shatteringly crispy crust without deep-frying. Just toss the drumsticks in the flour-cornstarch mix with paprika and garlic powder—no messy oil splatter, no waiting for the fryer to heat.
- Paprika Magic: That smoky, slightly sweet paprika clings to every bite, while the garlic powder adds a warm, savory punch. Honestly, the flavor is so good I’ll eat them straight from the pan—no sides needed.
- Game Day Ready: Between us, these drumsticks are my go-to for tailgates, game nights, or whenever I need something hearty but still easy. They reheat perfectly, so you can make a big batch and have leftovers for days.
- Budget Crunch: Chicken drumsticks are cheaper than thighs, and this recipe stretches them further with that ultra-crispy coating. Plus, the ingredients? Basic pantry staples—no specialty items, just pure, satisfying flavor.
Step-by-step instructions for crispy oven-baked fried chicken drumsticks
Here's the foolproof method for golden, shatteringly crisp drumsticks with juicy meat inside—no deep fryer required!
👨🍳 Step 1: Prep the Chicken and Seasoning Mix
Pat the 1.5 lb chicken drumsticks completely dry with paper towels—this is non-negotiable for crispiness. I press down firmly on each piece to remove all moisture from the skin and crevices. Place them on a wire rack set over a baking sheet to ensure air circulates on all sides.
In a large bowl, whisk together the 1 cup all-purpose flour, 0.5 cup cornstarch, 2 tbsp paprika, 1 tbsp garlic powder, 1 tbsp onion powder, 1.5 tsp salt, 1 tsp black pepper, and 0.5 tsp cayenne pepper. This dry mix is the secret to that perfect balance of crunch and flavor. I always sift it lightly through a fine-mesh sieve to break up any lumps—this ensures an even coating.
🥘 Step 2: Create the Buttermilk Bath
In a separate shallow dish, whisk the 1 whole large egg and 0.5 cup buttermilk until fully combined. The buttermilk should be room temperature—if it's cold, the coating won't adhere properly. I like to add 2 tbsp olive oil to this mixture for extra crispiness and richness. Dip each drumstick into the buttermilk mixture, letting any excess drip off before coating.
Now for the breading: Press each buttermilk-coated drumstick into the seasoned flour mixture, making sure every inch is fully covered. I use my fingers to pack the coating tightly against the chicken—this prevents clumping and ensures maximum crispiness. Place the coated drumsticks on a second wire rack set over a baking sheet, leaving space between each piece for even air circulation.
🔥 Step 3: Bake to Golden Perfection
Preheat your oven to 425°F with the rack positioned in the middle position. This high heat is crucial for creating that signature crispy crust. Once preheated, carefully transfer the rack with the coated drumsticks to the oven. Bake for 25 minutes, then flip each piece using tongs and bake for another 15-20 minutes until the coating is deep golden brown and crispy to the touch.
Here's the thing—don't peek! Every time you open the oven, you lose heat and steam, which can make the coating soggy. The drumsticks are done when they reach an internal temperature of 165°F at the thickest part of the meat and the coating is uniformly golden with no white spots. If you're unsure, check one piece early—the rest will follow.
⏰ Step 4: Rest and Serve
Transfer the drumsticks to a wire rack and let them rest for 5 minutes before serving. This resting period allows the juices to redistribute, preventing them from pooling out when you cut in. The coating will stay crispy during this time, but the meat will be even more tender.
Serve immediately with your favorite dipping sauces—classic ranch or a tangy honey mustard work perfectly. The contrast of that shatteringly crisp coating with the juicy, flavorful meat inside is what makes this recipe truly special. And the best part? You didn't need a deep fryer to achieve it!
Pro Tips For Making Best Oven Baked Fried Chicken Drumsticks
- Preheat Like It’s 1985: Your oven needs to hit 400°F before the chicken goes in—no exceptions. I learned this the hard way after sliding in cold drumsticks and ending up with soggy crusts instead of crispy ones. Give it 15 minutes to stabilize, and don’t even think about opening the door early.
- Mix Cornstarch In Dry: Toss the cornstarch directly with the flour and spices—no wet mixing. I used to whisk it into the buttermilk first, and the coating always turned gummy. Keep it dry until the chicken hits the pan, or you’ll regret it when the crust sticks like glue.
- Don’t Crowd the Pan: Leave at least an inch between drumsticks—this isn’t a sardine can. I once stuffed a sheet pan and spent 20 minutes flipping damp, half-cooked chicken. Space them out for even browning, and if you’re short on room, work in batches.
- Salt the Drumsticks First: Generously season the raw chicken before dredging—more salt than you’d use on a steak. The crust locks in flavor, and skipping this step means bland, dry meat no matter how crispy the outside gets. Trust me, your taste buds will notice.
Health benefits of this recipe
Protein Powerhouse
Each drumstick delivers about 30 grams of protein per serving—perfect for muscle repair and keeping you full for hours. The combination of skin-on chicken and the crispy coating makes this a satisfying, high-protein meal that rivals deep-fried versions.
I've found this is especially great for post-workout meals or when you need a hearty dinner without heavy carbs. 💪
Healthier Crispiness
Unlike traditional deep-fried chicken, this oven-baked version cuts hundreds of calories while keeping that addictive crunch. The cornstarch in the coating creates crispiness without needing oil immersion—just 2 tablespoons of olive oil for the buttermilk bath.
That's a fraction of the fat you'd get from frying, but with the same satisfying texture. My grandmother always said, "Good food doesn't have to be bad for you," and this proves it!
Low-Fat Flavor Boost
The seasoning blend—especially the smoked paprika and garlic powder—packs serious flavor without extra fat. These spices create a Maillard reaction (that's the fancy term for browning) that gives depth even when baking.
I've tested this with different spice levels, and even the mildest version tastes richer than many fried versions. Plus, the buttermilk marinade tenderizes the meat while adding just a touch of richness.
Balanced Nutrition
This recipe includes vitamin B12 (essential for energy) and phosphorus (great for bones) naturally found in chicken. The cornstarch adds a small amount of fiber, while the olive oil provides heart-healthy monounsaturated fats.
It's a rare dish that's both indulgent and nutritious—something my grandmother would approve of. The key is the high-heat baking method that keeps everything balanced without sacrificing flavor. ✨
Allergy-Friendly Options
For gluten-sensitive friends, you can swap the flour for a 1:1 gluten-free flour blend—just make sure it's well-mixed to avoid clumping. The cornstarch can stay as-is for crispiness. I've also made this with dairy-free buttermilk (just use unsweetened almond milk with a splash of vinegar) for those avoiding lactose.
The technique remains the same—just adjust the wet ingredients slightly for better coating adhesion.
Portion Control Made Easy
This recipe makes 4 servings, with each drumstick portion roughly 150-180 calories—about half the calories of traditional fried chicken. The crispy coating satisfies cravings while keeping portions reasonable. I often serve these as an appetizer with veggie sticks for a balanced meal.
The high-protein, lower-fat combo makes it a smart choice for anyone watching their intake without feeling deprived. 🍗
Nutrition facts
Frequently asked questions
Why do I need to pat the drumsticks completely dry?
Any moisture on the skin will create steam during baking, making the coating soggy instead of crispy. I learned this the hard way—my first batch turned out more like chicken pot pie than fried chicken! Use paper towels and press firmly to remove all moisture from the skin and crevices.
Can I use frozen drumsticks instead of fresh?
Just thaw them overnight in the fridge—never at room temperature. Frozen drumsticks work perfectly as long as they're fully thawed and patted very dry before coating. The texture and flavor stay just as good as fresh.
How do I keep the coating crispy after baking?
Transfer the baked drumsticks to a wire rack immediately after baking and let them rest for 5 minutes. This prevents sogginess from steam buildup. To reheat, place them on a wire rack in a 375°F oven for 5-7 minutes—never microwave, or the coating will turn rubbery.
What if my oven doesn't get hot enough?
If your oven runs hot, reduce the temperature to 400°F—but bake for 5-10 minutes longer to compensate. The key is achieving that 165°F internal temperature while keeping the coating golden. Use an oven thermometer to check your oven's actual heat if you're unsure.
Can I make this recipe gluten-free?
Yes! Replace the all-purpose flour with a 1:1 gluten-free flour blend and keep the cornstarch for crispiness. For best results, add 1 tbsp xanthan gum to the flour mix to help bind the coating. The texture will be slightly different but still delicious.