
Main Courses
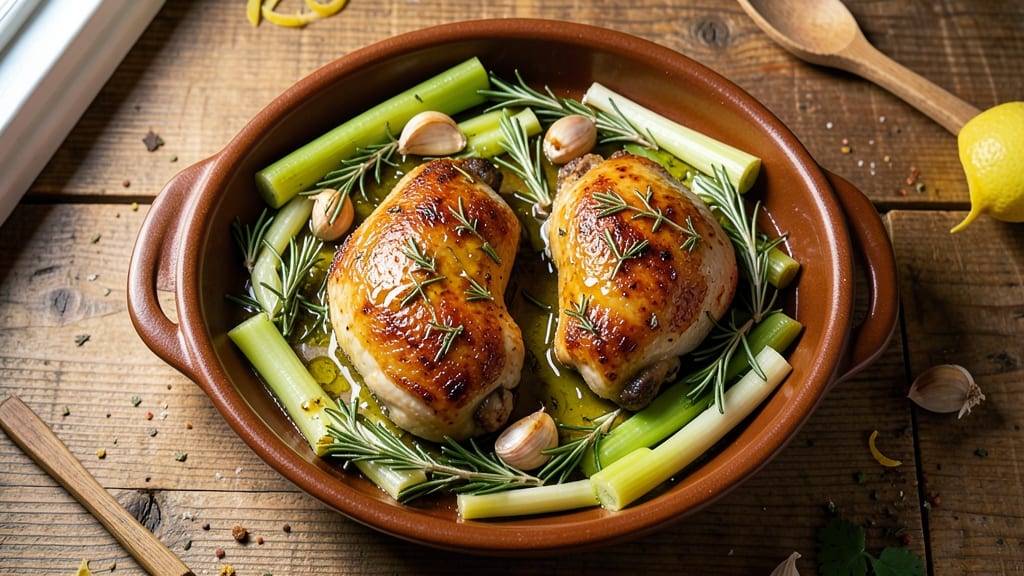
This baked chicken and celery recipe transforms simple ingredients into a restaurant-quality meal with minimal effort. The secret lies in balancing tender chicken with crisp-tender celery and aromatic herbs that infuse every bite.
I developed this recipe during a particularly busy week when I needed a dish that could handle itself in the oven while I focused on other preparations.
The beauty of this method is its simplicity—just a few fresh herbs, a splash of lemon, and quality chicken and celery on a single sheet pan. The high-heat roasting caramelizes the edges of the celery while keeping the chicken juicy and flavorful.
What you end up with is a dish that's hearty enough for a family dinner but easy enough for a weeknight.
Perfectly golden chicken thighs with crisp edges and tender centers pair beautifully with the slightly charred celery. The herbs create a fragrant aroma that fills your kitchen, making it impossible to resist digging in.
This recipe delivers a complete meal with minimal cleanup, and the flavors only get better as it rests.
Serve with a simple side salad or crusty bread to soak up the flavorful juices. The combination of textures and aromas makes this dish unforgettable—simple yet impressive enough for guests. Here's how to create it in your own kitchen.
Ingredients for baked chicken and celery
Simple ingredients for a dish that tastes like a restaurant made it.
| Ingredient | Amount | Notes |
|---|---|---|
| Chicken Thighs 🍗 | 1 ½ lb | Bone-in, skin-on preferred |
| Celery Stalks 🥬 | 4 whole | Trimmed, cut into 1-inch pieces |
| Fresh Rosemary 🌿 | ¼ cup | Chopped, stems removed |
| Fresh Thyme 🌿 | ¼ cup | Leaves only, stems removed |
| Garlic Cloves 🧄 | 4 cloves | Minced or finely chopped |
| Lemon Juice 🍋 | 2 tbsp | Freshly squeezed |
| Olive Oil 🫒 | ¼ cup | Extra-virgin for best flavor |
| Salt 🧂 | 1 ½ tsp | Kosher or sea salt |
| Black Pepper 🌶️ | ½ tsp | Freshly ground preferred |
| Honey 🍯 | 1 tbsp | For glaze, optional but recommended |
The chicken thighs make all the difference here—bone-in and skin-on gives you that crispy, juicy magic. Trader Joe's or Costco usually have great deals on family packs, but any grocery store's butcher section works. Look for thighs with good marbling—they stay juicier. Celery? Fresh is a must (the good stuff, not the pre-cut kind). I grab a bunch and keep it in the crisper drawer for up to 1 week. The herbs? Fresh is ideal, but dried works in a pinch—just use half the amount. For the garlic, peeling cloves is faster than mincing whole bulbs, trust me.
No fresh rosemary? Dried rosemary at half the amount gets you close, but the flavor won't be as bright. Short on thyme? Oregano or basil can step in, though they'll change the vibe slightly. The honey glaze is optional but worth it—it caramelizes beautifully and balances the herbs. No honey? Maple syrup or agave works too. Olive oil matters here—skip the cheap stuff. Trader Joe's has a great affordable extra-virgin option that's perfect for roasting. And if you're using pre-cut celery? Pat it dry really well—wet celery steams instead of caramelizing.
This dish reheats like a dream—even better the next day, honestly. Store leftovers in an airtight container for up to 4 days. For meal prep, portion into containers with a side of crusty bread or salad. The herbs lose potency fast, so if you're prepping ahead, keep them separate until right before serving. The celery stays crisp for 3 days in the fridge if you store it properly—wrap it in a damp paper towel and seal it in a bag. Freezing isn't recommended for celery, but the chicken can be frozen for 3 months if you're planning ahead.
Why You'll Love This Recipe
- One-Pan Magic: I swear by this recipe—just toss the chicken thighs, chopped celery, and those fragrant herbs on a sheet pan, drizzle with olive oil, and let the oven do the work. No pots, no pans, no stress. The celery softens just enough to soak up all the savory juices while the chicken gets that perfect golden crust.
- Herb-Packed Punch: Between us, the rosemary and thyme in this dish are chef’s kiss—earthy, bright, and lingering. The garlic cloves? They caramelize just enough to add a sweet, deep bite that makes every bite taste like a hug from a French bistro. (Yes, even on a Tuesday night.)
- Meal Prep MVP: This recipe doubles as my go-to for busy mornings—I bake a big batch on Sunday, and those leftovers reheat beautifully in lunches all week. The celery holds up surprisingly well, and the chicken stays juicy, so it’s basically the ultimate lazy-person’s lunchbox hero.
- Budget-Friendly Feast: Chicken thighs are my wallet’s best friend, and celery lasts forever in the crisper. Fresh herbs might seem fancy, but a few sprigs stretch across multiple meals. Honestly, this dish feeds four for under $10 and still feels like a special occasion—no takeout required.
Step-by-step instructions for herb-infused one-pan roast
This one-pan wonder delivers juicy chicken and tender celery with minimal effort.
Prep the Chicken and Vegetables
Start by trimming the celery stalks into 1-inch pieces—discard the tough ends and any stringy bits. Pat the 1.5 lb chicken thighs dry with paper towels, removing any excess moisture from the skin. This step is crucial for crispy skin later.
In a small bowl, combine the 0.25 cup chopped fresh rosemary, 0.25 cup fresh thyme leaves, 4 minced garlic cloves, 1.5 tsp salt, and 0.5 tsp black pepper. Mix well to create your herb blend. The rosemary and thyme will infuse the chicken with bright, aromatic flavors.
Create the Herb Marinade
In a large bowl, whisk together the 0.25 cup olive oil, 2 tbsp lemon juice, and the herb mixture you just prepared. This creates a fragrant marinade that will tenderize the chicken and add depth of flavor.
Add the chicken thighs to the bowl and turn to coat evenly. Let them marinate for at least 15 minutes—I like to do this while I prep the celery. The acidity in the lemon juice will break down the chicken fibers slightly, ensuring juicier meat.
Build the One-Pan Roast
Preheat your oven to 400°F. Place the marinated chicken thighs in a large oven-safe skillet or roasting pan. Arrange the celery pieces evenly around the chicken, leaving space for them to roast without crowding.
Drizzle any remaining marinade from the bowl over the chicken and celery. The celery will absorb the flavors and become tender without becoming mushy. If you're using the 1 tbsp honey, brush a light layer over the chicken thighs for a subtle glaze.
Roast to Golden Perfection
Transfer the skillet to the preheated oven and roast for 35-40 minutes, until the chicken reaches an internal temperature of 165°F and the skin is golden brown and crispy. The celery should be tender but still holding its shape.
For the last 5 minutes of cooking, increase the oven temperature to 425°F to crisp up the chicken skin. This high-heat finish creates that irresistible texture we all love. If the celery starts to brown too quickly, tent the pan loosely with foil.
Rest and Serve
Remove the chicken from the oven and let it rest for 5-10 minutes before serving. This resting time allows the juices to redistribute throughout the meat, preventing them from running out when you cut into it.
Serve the chicken and celery straight from the pan, drizzled with any pan juices. The celery will be perfectly tender with a subtle herbal flavor, while the chicken remains juicy and flavorful. Pair it with crusty bread or a simple green salad for a complete meal.
Pro Tips For Making Baked Chicken And Celery
- CRISP THE CELERY FIRST: I learned this the hard way—raw celery turns to mush when baked with chicken. Slice the stalks thin (1/4-inch or less) and blanch them in boiling water for 2 minutes, then shock in ice water. This keeps them crisp and bright, not sad and limp.
- SALT THE CHICKEN BEFORE SEASONING: Don’t just sprinkle rosemary and thyme on dry chicken—start with a heavy hand of salt (1 tsp per thigh) and let it sit for 10 minutes. This guarantees juicy meat and lets the herbs stick better. (Yes, even if you’re impatient like me.)
- WATCH THE THYME STEMS: Fresh thyme stems are tough and bitter, but the leaves are where the flavor lives. Strip them off quickly—don’t bother with the stems, and don’t crush the leaves. Toss them whole with the chicken so they perfume the dish instead of turning it to mush.
- START HIGH, END LOW: Crank the oven to 450°F for the first 15 minutes to render fat and brown the skin. Then drop to 375°F—this locks in moisture and keeps the celery from burning while the chicken finishes cooking. (Your future self will thank you.)
Essential equipment for baked chicken and celery
One-Pan Roasting Essentials
Your choice of pan makes all the difference here. I swear by a 12-inch cast iron skillet for that perfect sear—it retains heat like a dream and gives you crispy skin on the chicken.
If you don’t have cast iron, a stainless steel sheet pan works just as well. Just avoid nonstick—it won’t handle the high heat needed for that golden crust. 🔥
For even cooking, I recommend a half-sheet pan if you’re making this for a crowd—it gives your chicken and celery room to breathe. The key is to avoid overcrowding, which can lead to steamed celery instead of caramelized perfection.
If you’re using a skillet, keep the batch small (4-6 thighs max) to maintain even heat distribution.
Temperature Gauge Must-Haves
Never guess the doneness of your chicken—instant-read thermometers are non-negotiable. I use a ThermoWorks Smoke because it’s fast and accurate, but even a basic Thermopop works in a pinch.
Insert the probe into the thickest part of the thigh (avoid the bone) and aim for 165°F—that’s when you know it’s safe and juicy. 🌡️
For the celery, there’s no exact temp—just watch for tender-crisp texture. If it’s still crunchy after 35 minutes, it’s ready. Pro tip: If your oven runs hot, check the chicken at 30 minutes to avoid overcooking. Ovens vary wildly, so always adjust based on your own.
Herb Prep Tools
Fresh herbs make or break this dish, so invest in a good herb scissors or microplane for rosemary and thyme. A sharp chef’s knife works too, but I find scissors give me cleaner, more precise cuts.
For garlic, a garlic press is my go-to—it’s faster than mincing and ensures even distribution. 🧄
If you’re using dried herbs, crush them between your fingers or with a mortar and pestle to release their oils. Fresh herbs need no extra prep beyond chopping, but dried ones benefit from this step.
I keep a small spice grinder just for this purpose—it’s a game-changer for dried herb blends.
Optional Glazing Gear
The honey glaze adds a beautiful caramelized finish, but you’ll need a small pastry brush to apply it evenly. A silicon brush is my favorite because it’s heat-resistant and easy to clean.
If you skip the honey, a quick drizzle of olive oil before the final 5 minutes at 425°F helps crisp the skin. 🍯
For extra flavor, I sometimes add a pinch of smoked paprika to the honey glaze—it pairs amazingly with the rosemary. Just mix it into the honey before brushing. A small mixing bowl and fork are all you need for this quick step.
Keep it simple, but don’t skip the glaze if you’re aiming for that restaurant-worthy crust.
Nutrition facts
Frequently asked questions
Can I use chicken breasts instead of thighs?
You can, but thighs work better for this recipe. Chicken breasts cook faster and tend to dry out at 400°F. If you use them, reduce oven temperature to 375°F and check for doneness at 25 minutes—they're done at 165°F internal temp. For extra moisture, butterflying the breasts helps too.
What if I don't have fresh rosemary or thyme?
No problem! Use ½ tsp dried rosemary and ½ tsp dried thyme instead. Crush the dried herbs between your fingers to release their oils. For a different flavor profile, swap with 1 tsp dried oregano or 1 tbsp fresh parsley. The dish will still taste amazing—just slightly different.
How do I keep the celery from getting mushy?
Celery turns mushy when it steams instead of roasting. Cut it into 1-inch pieces and spread them out in a single layer around the chicken. Avoid overcrowding the pan, and if needed, tent with foil for the first 20 minutes to prevent early browning. The high heat at the end (425°F) caramelizes it perfectly.
Can I make this ahead of time?
Cook the chicken and celery as directed, then let it cool completely. Store in an airtight container in the fridge for up to 4 days. Reheat covered at 350°F for 15-20 minutes until warmed through. The flavors actually improve overnight—just add fresh herbs when reheating for maximum aroma.
What are the best sides to serve with this?
This dish pairs beautifully with anything that soaks up the flavorful juices. Try crusty sourdough bread, creamy mashed potatoes, or a simple arugula salad with lemon vinaigrette. For a lighter option, roasted carrots or Brussels sprouts add great texture contrast. The celery's herbal notes complement fresh herbs in salads too.