
Main Courses
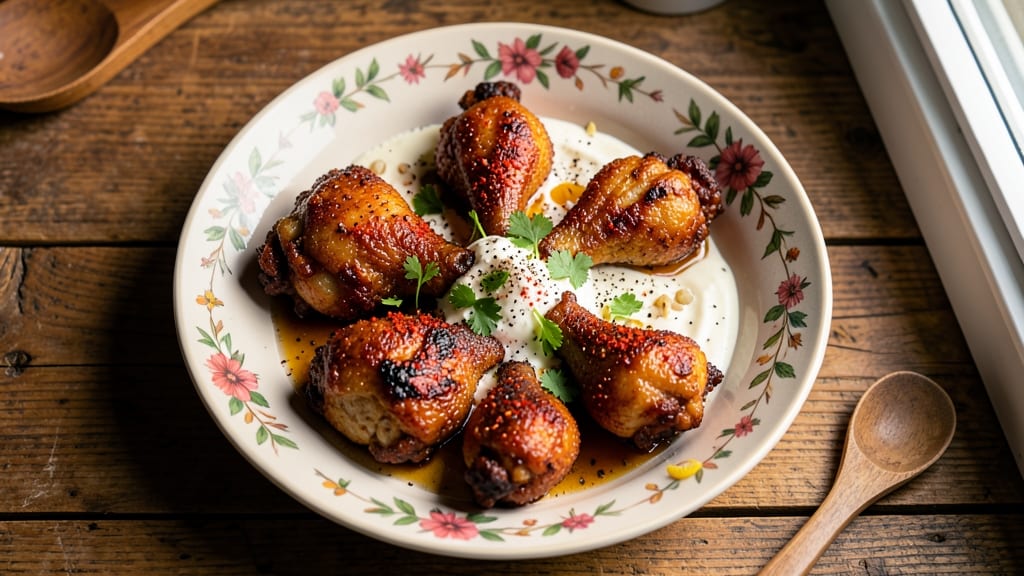
This Bohra fried chicken recipe delivers the crispy, golden perfection that makes it a centerpiece of Gujarati celebrations. The secret lies in the yogurt marinade—spiced with turmeric, coriander, and black pepper—giving the chicken a tender, flavorful core while the double-frying technique creates that signature crunch.
I first encountered this method in a Mumbai restaurant where the aroma alone could fill a room, and I’ve since perfected it at home for gatherings where tradition meets cravings.
The process begins with a 24-hour marinade in yogurt and spices, ensuring deep flavor penetration, followed by a light batter of chickpea flour and baking soda for that signature crisp. The chicken is fried twice—once to render fat and set the crust, then again for that irresistible crunch.
This isn’t just a recipe; it’s a taste of home, where every bite carries the warmth of Bohra hospitality. The key is patience: letting the marinade work its magic and frying in small batches to maintain oil temperature.
What you’ll end up with is golden, crispy chicken that shatters at the edges yet stays juicy inside, infused with the earthy warmth of turmeric and the bright tang of yogurt. The aroma alone—smoky, spiced, and deeply satisfying—will have everyone at the table reaching for seconds.
Serve with mint chutney and lemon wedges to cut through the richness, and prepare to be transported to the vibrant streets of Surat or the cozy kitchens of Gujarati homes.
This recipe scales beautifully for parties, and the leftovers reheat surprisingly well, making it perfect for meal prep. The technique is foolproof once you master the double-fry, and the spices are easy to find at Indian grocery stores.
Whether you’re cooking for a celebration or a weeknight craving, this Bohra fried chicken delivers restaurant-quality results at home. Let’s get started—your taste buds will thank you.
Ingredients for bohra fried chicken
Gather these spices, yogurt, and chicken for the crispy, golden Bohra fried perfection.
| Ingredient | Amount | Notes |
|---|---|---|
| Boneless Chicken Thighs 🍗 | 1 ½ lb | Skin-on preferred for crispiness |
| Plain Yogurt 🥛 | 1 cup | Full-fat, unsweetened |
| Turmeric Powder 🌿 | 1 tsp | Bright yellow, freshly ground |
| Ground Coriander 🌿 | 1 ½ tsp | Freshly ground preferred |
| Ground Black Pepper 🌶️ | 1 tsp | Freshly cracked for intensity |
| Chickpea Flour 🌾 | ½ cup | Also called besan |
| Baking Soda 🧂 | ½ tsp | Essential for crispiness |
| Vegetable Oil 🫒 | 3 cups | For deep frying |
| Lemon Juice 🍋 | 1 tbsp | Freshly squeezed |
| Salt 🧂 | 1 ½ tsp | Kosher or sea salt |
| Garlic Cloves 🧄 | 4 cloves | Minced for marinade |
| Ginger 🌿 | 1 tbsp | Freshly grated |
| Red Chili Powder 🌶️ | ½ tsp | Adjust to taste |
| Fresh Mint Leaves 🌿 | ¼ cup | Chopped for garnish |
The yogurt marinade is non-negotiable here—full-fat Greek-style yogurt works best for that rich texture. Look for Indian grocery stores for the best turmeric and coriander, or grab Penzeys spice blends if you're near a specialty shop. The chicken thighs should have good fat marbling for crispiness. I always buy bone-in, skin-on thighs from the butcher section—the skin adds extra crunch. If you can't find them, skinless thighs still work but won't be as crispy. The spices? Freshly ground coriander and turmeric make all the difference—pre-ground loses potency fast.
No chickpea flour? All-purpose flour plus 1/4 tsp baking soda is a decent swap, but the texture won't be quite the same. Short on yogurt? Coconut yogurt works too, though the flavor will be slightly different. The double-fry technique is key—first fry renders fat and sets the crust, then the second fry creates that signature crunch. Trader Joe's has great vegetable oil in bulk if you're prepping for a crowd. For the marinade, I like to add a splash of lemon juice right before frying to brighten the flavors. And trust me on the baking soda—it's what makes this crispy, not just the flour.
This keeps for 3 days in the fridge if you're lucky—it disappears fast! Reheat in a 200°F oven for 10 minutes to restore crispiness. For parties, double the batch and fry in batches to keep oil temp steady. The leftovers reheat surprisingly well, but nothing beats fresh. Store the marinade spices in a glass jar in your pantry—they'll last 6 months. And if you're making mint chutney, chop the mint fresh—store-bought loses flavor fast.
Why You'll Love This Recipe
- I swear by this shortcut: just mix the yogurt with turmeric, coriander, and black pepper right before coating. The chicken absorbs the flavor while it fries—no waiting around for hours.
- No-Marination Needed: I swear by this shortcut: just mix the yogurt with turmeric, coriander, and black pepper right before coating. The chicken absorbs the flavor while it fries—no waiting around for hours.
- Tangy-Creamy Crunch: That yogurt marinade gives it a velvety bite, while the frying creates a satisfying crunch. The turmeric leaves it golden, and the coriander adds a subtle warmth that sticks with you.
- Party-Proof Performer: Serve it at gatherings with zero stress—it reheats like a dream and pairs with anything. My in-laws always ask for the recipe after one bite, and I’ve never had to stress over presentation.
Step-by-step instructions for Bohra fried chicken
Here's how to make restaurant-quality Bohra fried chicken at home with that signature crispy crust and tender inside.
Marinate the Chicken in Spiced Yogurt
In a large bowl, combine the 1 cup plain yogurt, 1 tbsp lemon juice, 1.5 tsp salt, 1 tsp turmeric powder, 1.5 tsp ground coriander, 1 tsp ground black pepper, 0.5 tsp red chili powder, 4 cloves minced garlic, and 1 tbsp grated ginger. Mix until the spices dissolve completely into the yogurt.
Add the 1.5 lb boneless chicken thighs to the marinade, coating each piece thoroughly. Cover the bowl and refrigerate for at least 4 hours, preferably overnight. This long marinating time ensures maximum flavor penetration and tender meat. The yogurt will start to thicken as it absorbs into the chicken, creating that signature Bohra texture.
Prepare the Chickpea Flour Batter
In a separate bowl, whisk together the 0.5 cup chickpea flour and 0.5 tsp baking soda until fully combined. The baking soda is crucial here—it reacts with the chickpea flour to create that signature crispy crust. Slowly add about ½ cup water while whisking continuously until you achieve a smooth, thick batter consistency—similar to pancake batter but slightly thicker.
Let the batter rest for 10 minutes before using. This resting period allows the chickpea flour to fully hydrate and creates a better coating for the chicken. The batter should be thick enough to cling to the chicken without dripping, but still smooth enough to spread evenly.
Heat the Oil for Deep Frying
Fill a deep, heavy-bottomed pot with 3 cups vegetable oil and place it over medium heat. Insert a deep-fry thermometer and heat the oil until it reaches 350°F. You'll know it's ready when a small piece of bread dropped into the oil sizzles and floats immediately.
Maintain the oil temperature between 350-360°F throughout frying. If the oil gets too hot, the chicken will burn on the outside before cooking through. If it's too cool, the coating won't crisp properly. I like to keep a small bowl of ice water nearby to cool the chicken slightly after frying—this helps set the crust while keeping the meat juicy.
Fry the Chicken to Golden Perfection
Working in batches to avoid overcrowding, remove the chicken from the marinade (letting excess drip off) and dip each piece into the chickpea flour batter, coating it completely. Gently press the coating against the chicken to ensure even coverage.
Carefully lower the coated chicken into the hot oil using tongs. Fry for 4-5 minutes per side until the coating is deep golden brown and the chicken reaches an internal temperature of 165°F. The coating should be crispy enough to hold its shape when you lift it from the oil.
Rest and Garnish
Transfer the fried chicken to a wire rack set over a paper towel-lined plate. Let it rest for 5 minutes to allow the coating to set completely. This resting period is crucial—it prevents the coating from becoming soggy when you serve it.
While the chicken rests, finely chop the 0.25 cup fresh mint leaves. Once the chicken is ready, sprinkle the chopped mint over each piece. The mint adds a bright, fresh contrast to the rich, spiced chicken. Serve immediately with your favorite dipping sauce or with a side of lemon wedges for squeezing.
Pro Tips For Making Bohra Fried Chicken
- Marinate Overnight: I learned this the hard way—skipping the overnight soak means the yogurt marinade just sits on top instead of tenderizing the meat. Use whole milk yogurt (not Greek) and let those thighs swim in it for at least 12 hours, or until the edges start looking slightly translucent.
- Pat Dry Twice: After draining the yogurt, give those thighs a real dry with paper towels—first a rough wipe, then a second pass with fresh towels. Wet spots = steam = soggy crust. (Yes, even if you’re impatient like me.)
- Double-Fry for Crisp: Start in hot oil (350°F/175°C) until the yogurt coating sets into a crust, then pull them out and let them rest 5 minutes. Fry again at 375°F (190°C) until golden—this second hit locks in the crunch without burning the outside.
- Skip the Crowding: Does it look weird? Yes. Does it work? Every single time. Fry in batches of 2-3 thighs max—overcrowding drops the oil temp, and you’ll end up with greasy, unevenly cooked chicken. (Your future self will thank you.)
Troubleshooting perfect results
Oil Temp Troubles
If your oil isn't hot enough (350°F), the coating will absorb oil instead of crisping. I've seen this happen when using a lightweight pot—the oil temperature drops too fast.
Use a heavy-bottomed cast iron skillet or Dutch oven to maintain steady heat. A deep-fry thermometer is non-negotiable here. 🌡️
Too hot? You'll get burnt edges before the chicken cooks through. I once charred an entire batch because I rushed the heating—always monitor that thermometer! If your oil smokes excessively, turn the heat down immediately and let it recover before proceeding.
Batter Consistency Issues
The batter should be thick like pancake batter but not gluey. If it's too thin, the coating won't crisp properly. I've fixed this by adding 1 tbsp more chickpea flour at a time until it reaches the right consistency.
Too thick? Thin it with 1 tsp water at a time. The key is 10 minutes of resting—this lets the flour hydrate properly for that signature crisp.
Pro tip: Use a wire whisk to avoid lumps. I've seen home cooks skip this and end up with gummy coatings. The baking soda is your secret weapon—it reacts with the chickpea flour to create that magical crispiness. Don't skip it!
Chicken Staying Soggy
Overcrowding the fryer is the #1 reason for soggy chicken. I've made this mistake too—don't fry more than 2-3 pieces at a time. Each piece needs room to crisp without steaming.
After frying, transfer to a wire rack (not paper towels) to let air circulate. This sets the crust properly while keeping the meat juicy.
Another common issue: not resting the chicken. I've seen people serve it immediately, and the coating turns greasy. Always let it rest for 5 minutes before serving. This crucial step prevents sogginess and maintains that perfect crunch.
Marinade Not Working
If your chicken tastes bland after marinating, check your spice freshness. I've ruined batches using old spices—always buy freshly ground coriander and turmeric. The yogurt should be full-fat and unsweetened.
I like to add 1 tbsp lemon juice right before frying to brighten the flavors. Marinate for at least 4 hours**, but overnight is best for maximum tenderness.
Another trick: Pound the chicken thighs slightly with a meat mallet before marinating. This helps the spices penetrate deeper. I've seen this technique in professional kitchens—it makes a noticeable difference in flavor distribution.
Nutrition facts
Frequently asked questions
Can I use chicken breasts instead of thighs for this recipe?
Chicken breasts will work, but thighs are preferred for Bohra fried chicken. The thighs have more fat and connective tissue, which keeps the meat juicy during frying. If using breasts, pound them to an even thickness and marinate for at least 6 hours to prevent drying out. The skin-on thighs create extra crispiness—breasts won't achieve the same texture.
What's the secret to getting that extra-crispy coating?
The double-fry technique is key! First fry renders fat and sets the crust, then the second fry at 375°F creates that signature crunch. Also, use chickpea flour (besan) instead of all-purpose flour—the higher protein content creates a better crust. The baking soda is your secret weapon—it reacts with the flour to create air pockets for maximum crispiness.
Can I make this recipe ahead of time?
You can prep the marinade up to 2 days ahead and store it in the fridge. For the fried chicken, cook it fresh for best results, but you can reheat in a 200°F oven for 10 minutes to restore crispiness. The coating loses crunch when reheated, so it's best served immediately. The marinade spices can be stored in a glass jar for 6 months in your pantry.
What's the best way to store leftover fried chicken?
Store in an airtight container in the fridge for up to 3 days. To reheat, place in a 350°F oven for 8-10 minutes on a wire rack (not paper towels) to maintain some crispiness. For longer storage, freeze for up to 2 months. Thaw overnight in the fridge before reheating. The coating will be softer after freezing, but the flavor remains delicious.
How do I adjust the spice level for kids?
Reduce the red chili powder to ¼ tsp or omit it completely. The yogurt marinade already has mild spices like coriander and turmeric, so the base flavor remains delicious. For extra kid-friendly appeal, serve with mango chutney or a sweet tamarind sauce. The crispy coating and tender meat will still be a hit without the heat!