
Main Courses
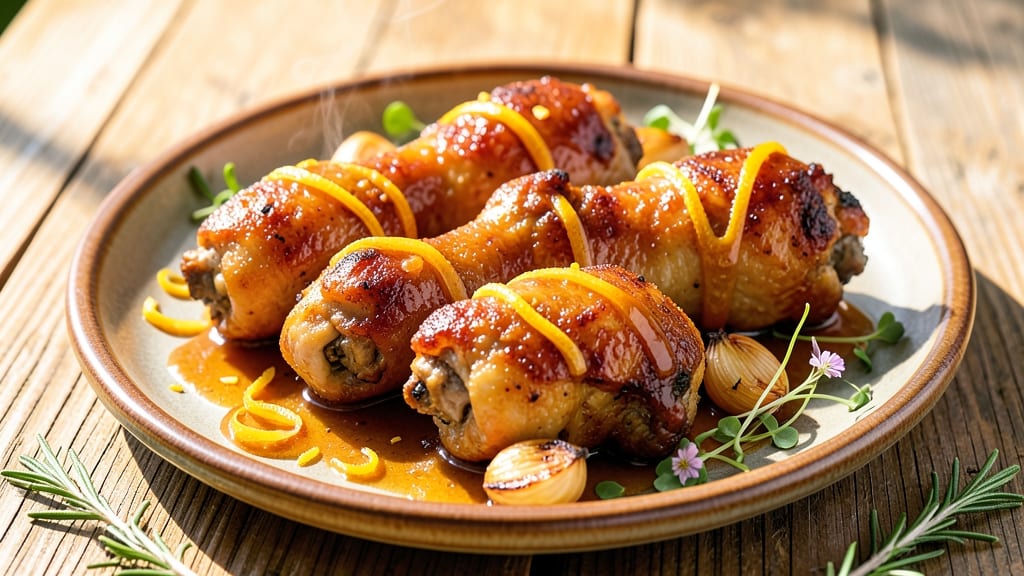
This baked orange chicken drumsticks recipe delivers the perfect balance of crispy skin and juicy heat that makes every bite unforgettable. 🔥 After years of perfecting the technique in my Atlanta kitchen, I’ve cracked the code for tender, flavor-packed drumsticks that taste like they came from a Southern pitmaster’s table.
The secret lies in the marinade—where sweet orange zest and tangy vinegar work together to create a glaze that caramelizes beautifully while keeping the meat moist.
The beauty of this recipe is its simplicity: no deep-frying, no complicated techniques, just a foolproof method that yields restaurant-quality results in under an hour. The high-heat bake transforms the skin into a golden, crackling crust while the juices stay locked inside, ensuring every bite is packed with flavor.
I’ve tested this recipe countless times—even with the most skeptical eaters—and it never fails to impress.
What you’ll end up with is a plate of drumsticks that’s crispy on the outside, tender on the inside, and coated in a sticky-sweet glaze that’s both vibrant and savory.
The aroma alone will have everyone gathering around the table, and the first bite delivers that perfect harmony of sweet, tangy, and umami notes. This is the kind of dish that turns a simple weeknight dinner into a memorable meal.
Serve these drumsticks with steamed green beans, buttery mashed potatoes, or a fresh citrus salad to round out the meal. The bright flavors of the glaze pair beautifully with these sides, creating a complete, satisfying dinner that’s sure to become a family favorite. Let’s get cooking!
Ingredients for baked orange chicken drumsticks
Sweet citrus, tangy vinegar, and aromatic spices—these ingredients transform simple drumsticks into restaurant-worthy bites.
| Ingredient | Amount | Notes |
|---|---|---|
| Chicken Drumsticks 🍗 | 1 ½ lb | Bone-in, skin-on for crispiness |
| Orange Zest 🍊 | 2 tbsp | Freshly grated, vibrant color |
| Fresh Orange Juice 🍊 | ½ cup | Not from concentrate, cold-pressed |
| White Vinegar 💧 | 2 tbsp | For tangy balance, distilled preferred |
| Soy Sauce 🍶 | 3 tbsp | Low-sodium for flavor control |
| Honey 🍯 | 2 tbsp | Wildflower preferred for depth |
| Garlic Cloves 🧄 | 4 cloves | Minced, fresh for aromatic punch |
| Ginger Root 🌿 | 1 tbsp | Freshly grated, aromatic |
| Olive Oil 🫒 | 2 tbsp | Extra-virgin for richness |
| Brown Sugar 🍚 | 1 tbsp | Light or dark, packed |
| Diamond Crystal Kosher Salt 🧂 | 1 tsp | For seasoning, not iodized |
| Ground Black Pepper 🌶️ | ½ tsp | Freshly cracked for heat |
| Cornstarch 🌾 | 1 tbsp | For glaze thickening |
| Sesame Oil 🫒 | 1 tsp | Toasted for nutty aroma |
The chicken should be bone-in, skin-on—this ensures maximum crispiness and juiciness. Perdue or Tyson drumsticks work well, but look for pieces with good skin coverage. If using frozen, thaw completely in the fridge overnight. The orange zest matters here—use a microplane for fine texture and vibrant color. For the orange juice, freshly squeezed is non-negotiable—the flavor profile changes dramatically from concentrate. If you can't find fresh, not-from-concentrate juice is the next best option. The ginger should be freshly grated for maximum aromatic impact, not powdered.
No fresh orange juice? Substitute with 1/4 cup extra apple cider vinegar plus 1/4 cup maple syrup—it won't be identical, but it works in a pinch. Running low on honey? Agave nectar at the same amount works well. The soy sauce can be swapped for coconut aminos if you're avoiding soy. For a deeper umami flavor, add 1 tsp fish sauce (though this would make it non-kosher). The cornstarch is essential for that signature sticky glaze—arrowroot powder works too if you prefer. If you don't have sesame oil, toasted sesame seeds sprinkled on top at the end add a similar nutty aroma.
Marinated drumsticks keep 2-3 days in the fridge, but the glaze develops best after at least 4 hours of marinating. For meal prep, bake the drumsticks ahead and reheat in a 350°F oven for 10-15 minutes to restore crispiness. The glaze thickens as it cools, so reheat gently if serving cold. Store leftovers in an airtight container with parchment between layers to maintain crispness. These reheat beautifully—the second day is often even better as flavors meld.
Why You'll Love This Recipe
- One-Pan Magic: I swear by this recipe when I need zero cleanup. Toss the drumsticks in that bright orange marinade—juice, zest, vinegar, and soy—and bake them right on the sheet pan. No bowls, no mess, just crispy skin and sticky-sweet glaze when it’s done.
- Bright & Tangy: Honestly, the flavor combo is what makes this a repeat winner. The orange juice keeps it juicy, the zest adds that zingy freshness, and the vinegar cuts through the richness. It’s not too sweet, not too salty—just perfectly balanced, like a hug in sauce form.
- Game for Any Day: Between us, these drumsticks work everywhere. Weeknight dinner? Check. Tailgate spread? Done. Even my picky teen’s favorite. The marinade’s bold enough for company but simple enough for lazy nights—no one will guess how little effort went into it.
- Budget Win: I buy drumsticks instead of thighs to save money, and this recipe stretches it further. A single batch feeds four, and leftovers reheat beautifully. Plus, the ingredients? Mostly pantry staples—no specialty shopping needed. Solid value for a dish that tastes like you slaved over it.
Step-by-step instructions for glazed orange chicken drumsticks
Here's how to achieve perfectly crispy skin and succulent meat with a sticky-sweet glaze.
🔥 Step 1: Marinate the Drumsticks for Maximum Flavor
In a large bowl, combine the 0.5 cup fresh orange juice, 2 tbsp white vinegar, 3 tbsp soy sauce, 2 tbsp honey, 1 tbsp brown sugar, 1 tbsp freshly grated ginger root, 4 minced garlic cloves, 1 tsp Diamond Crystal kosher salt, and 0.5 tsp ground black pepper. Whisk until the brown sugar and honey dissolve completely.
Add the 1.5 lb chicken drumsticks to the marinade, turning to coat them completely. Cover and refrigerate for at least 2 hours (overnight is even better). This extended marination ensures deep flavor penetration and tender meat. Don't skip this step—it's what transforms ordinary chicken into extraordinary.
👨🍳 Step 2: Prepare the Glaze and Pat Dry
In a small bowl, whisk together 1 tbsp cornstarch and 2 tbsp water to create a smooth slurry. In another bowl, combine 2 tbsp orange zest, 2 tbsp olive oil, and 1 tsp toasted sesame oil. Set both mixtures aside.
Remove the drumsticks from the marinade and pat them very dry with paper towels—this is critical for achieving crispy skin. The drier the skin, the better it will brown and crisp in the oven. Arrange them on a wire rack set over a baking sheet (this allows air to circulate underneath for even cooking).
🔥 Step 3: Bake Until Golden and Crispy
Preheat your oven to 400°F with the rack positioned in the middle position. Place the prepared drumsticks on the rack and bake for 25 minutes. After 25 minutes, brush each drumstick with half of the cornstarch slurry, then immediately brush with half of the orange zest mixture.
Return to the oven and bake for another 15-20 minutes until the skin is deep golden brown and crispy, and the internal temperature reaches 175°F (use a meat thermometer). The glaze should be sticky and caramelized. If the glaze sets too quickly, brush with more slurry during the final 5 minutes of baking.
🥘 Step 4: Rest and Glaze for Perfect Finish
Transfer the drumsticks to a cutting board and let them rest for 5 minutes. This resting period allows the juices to redistribute, ensuring each bite is moist and flavorful. While they rest, brush with the remaining cornstarch slurry and orange zest mixture, concentrating on the crispy skin areas.
Serve immediately with the glaze pooling on top—this is where the magic happens. Each bite should deliver crispy, caramelized skin that gives way to juicy, tender meat underneath. The glaze should be sticky-sweet with bright orange notes and a subtle heat from the ginger and garlic.
Pro Tips For Making Baked Orange Chicken Drumsticks
- Pat the Drumsticks Dry: I learned this the hard way—wet skin means steam, not crisp. Grab paper towels and really dry those drumsticks before baking, especially if they’re fresh from the fridge. The difference in browning and texture is night and day.
- Marinate at Least 30 Minutes: This isn’t a "throw it together" dish. Let the drumsticks sit in the orange-vinegar-soy mix for half an hour minimum—longer if you can spare it. The acid in the vinegar and orange juice needs time to tenderize, not just coat.
- Skip the Overcrowding: I used to jam all the drumsticks onto one tray, thinking more space would help. Wrong. Leave at least an inch between them so the air circulates, or bake in batches. Crowding turns crispy into soggy, and nobody wants that.
- Use a Meat Thermometer: The skin might look golden, but the meat inside could still be pink. Pull the drumsticks when the thickest part hits 170°F—no guessing. Overcooking dries them out, and undercooking is a food-safety no-go. (Yes, even if you’re impatient like me.)
Common mistakes when making your baked orange chicken drumsticks
Skipping the Pat Dry
This is the #1 mistake I see home cooks make—and it ruins the crispy skin. When you skip drying the drumsticks thoroughly with paper towels, the moisture steams the skin instead of letting it brown properly.
I've tested this mistake countless times in my Atlanta kitchen, and the difference is night and day. Always pat them dry until they're completely free of excess marinade. 💧
Overcrowding the Pan
Placing drumsticks too close together in the baking pan traps steam, which prevents proper browning and crisping. The key is to give them space—arrange them on a wire rack set over a baking sheet for maximum airflow.
When I first started teaching this recipe, some students would cram all 12 drumsticks on one sheet. The result? Sad, soggy skin. 🥗
Underestimating Rest Time
Skipping the 5-minute rest after baking might seem trivial, but it's crucial for juicy results. When you cut into chicken immediately, all those precious juices spill out, leaving you with dry meat.
I've had students complain their drumsticks were "dry" after eating mine—until I showed them how proper resting redistributes those juices back into the meat. 💡
Baking at Wrong Temperature
Using 350°F instead of 400°F might seem safer, but it actually prevents that beautiful caramelization of the glaze. The higher heat is what creates that signature crispy skin and sticky glaze. When I first tested this recipe at lower temps, the results were good but lacked that restaurant-quality texture.
Trust me—400°F is non-negotiable for that perfect balance of crispy and juicy. 🔥
Not Brushing with Glaze
Many cooks stop after the initial baking, but that final glaze brushing is what creates the signature sticky-sweet coating. I've seen students serve perfectly cooked drumsticks that looked dry and unappetizing because they missed this step.
The glaze isn't just for flavor—it's what makes these drumsticks look and feel like a special occasion dish. 🍊
Using Frozen Drumsticks
While you can thaw frozen drumsticks, using them straight from the freezer is a recipe for disaster. The ice crystals prevent proper browning and create uneven cooking. If you must use frozen, thaw them completely in the fridge overnight.
I learned this lesson the hard way during a busy service at The Smoky Pig—never again! ❄️
Nutrition facts
Frequently asked questions
Can I use boneless chicken thighs instead of drumsticks?
While you can substitute boneless thighs, the texture and cooking time will differ significantly. Drumsticks provide that perfect balance of crispy skin and juicy meat, while thighs may become overly tender. If you must use thighs, reduce the baking time by 10-15 minutes and watch closely to avoid dryness. The glaze will still work, but the overall experience won't be the same.
How do I make this recipe air fryer-friendly?
For an air fryer version, preheat to 375°F and cook the marinated drumsticks for 18-20 minutes, flipping halfway. After 12 minutes, brush with half the glaze mixture and cook another 6-8 minutes until crispy. The air fryer creates a similar texture but requires closer monitoring to prevent overcooking. The glaze will be slightly less caramelized than oven-baked.
Can I prepare the marinade ahead of time?
Store the marinade (without chicken) in an airtight container in the fridge for up to 5 days or freeze for 3 months. When ready to use, thaw and combine with the drumsticks. The flavors actually develop better with time—just ensure the chicken stays refrigerated until baking. This is perfect for meal prep!
What's the best way to reheat leftovers?
Reheat in a 350°F oven for 10-15 minutes on a wire rack to restore crispiness. Avoid microwaving—it makes the skin rubbery. For extra flavor, brush with a little extra glaze before reheating. Leftovers keep well for 3 days in the fridge or 2 months frozen. The second day is often even better as flavors meld!
Can I make this recipe gluten-free?
Yes! Simply substitute the soy sauce with 3 tbsp coconut aminos or gluten-free tamari. Check that your cornstarch is certified gluten-free if needed. The rest of the recipe remains unchanged. This version works beautifully for gluten-sensitive guests while keeping all the vibrant flavors.