
Main Courses
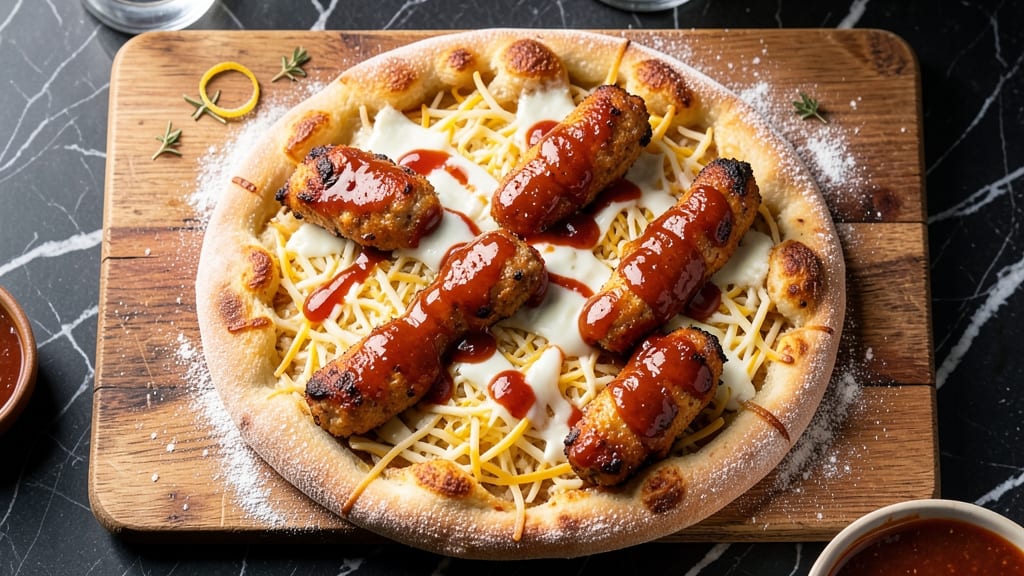
This buffalo chicken finger pizza recipe delivers the perfect balance of crispy crust, spicy kick, and melty cheese—all in one pull-apart masterpiece. 🔥 The secret lies in combining store-bought dough with homemade buffalo chicken fingers, ensuring every bite delivers that signature tangy heat and tender texture.
I developed this recipe after years of perfecting my buffalo chicken game, and it’s become a crowd-pleaser at every gathering.
The foundation starts with a simple, foolproof dough that bakes up crispy and golden, while the buffalo chicken fingers add protein and that signature spicy-sweet flavor. Shredded chicken tossed in buffalo sauce gets layered between mozzarella and cheddar, creating a gooey, cheesy pull-apart experience with every slice.
This isn’t just pizza—it’s a flavor-packed meal that brings the best of buffalo wings and pizza together in one dish.
What you’ll end up with is a pizza that’s crispy on the edges, cheesy in the middle, and packed with that irresistible buffalo heat. The combination of tender chicken, tangy sauce, and melted cheese makes this dish impossible to resist.
It’s the kind of recipe that turns an ordinary weeknight into a flavorful celebration, and it’s easier to make than you’d think.
Serve it with a side salad, extra ranch for cooling the heat, or even celery sticks for dipping—this pizza is versatile enough to fit any meal. Let’s get started on creating this crispy, cheesy, spicy masterpiece that’ll have everyone asking for seconds.
Ingredients for buffalo chicken finger pizza
Crispy dough, spicy chicken, melty cheese—this pizza brings it all together in one bite.
| Ingredient | Amount | Notes |
|---|---|---|
| Store-Bought Pizza Dough 🍕 | 1 lb | Pre-shaped or rolled out |
| Boneless Chicken Breast 🍗 | 1 ½ lb | Pounded to 1/4-inch thickness |
| Buffalo Sauce 🌶️ | 1 cup | Hot sauce + melted butter mix |
| Shredded Mozzarella Cheese 🧀 | 2 cups | Part-skim or whole milk |
| Shredded Cheddar Cheese 🧀 | 1 cup | Sharp or mild variety |
| All-Purpose Flour 🌾 | ½ cup | For breading chicken |
| Large Eggs 🥚 | 2 whole | Beaten for dipping |
| Panko Breadcrumbs 🍞 | ½ cup | For extra crunch |
| Butter 🧈 | 2 tbsp | Melted for sauce |
| Hot Sauce 🌶️ | ½ cup | Frank's RedHot preferred |
| Garlic Powder 🧄 | 1 tsp | For flavor boost |
| Onion Powder 🧅 | 1 tsp | For extra depth |
| Ranch Dressing 🥛 | ¼ cup | For serving (optional) |
| Olive Oil 🫒 | 1 tbsp | For dough brushing |
The dough is everything here. Pillsbury Classic or Boboli are my go-tos—they bake up crispy without fuss. If you're feeling fancy, grab a pre-made pizza dough from the refrigerated section at Whole Foods or Trader Joe's—just make sure it's not pre-baked. For the chicken, boneless breasts are easiest, but thighs work too if you prefer juicier bites. Pound them thin (about 1/4-inch) so they cook fast and stay tender. The secret to great buffalo sauce? Equal parts melted butter and hot sauce—Frank's RedHot is the gold standard, but any good hot sauce works.
No panko? Crushed cornflakes or regular breadcrumbs are solid swaps—they just won’t be as crispy. Short on ranch? Greek yogurt + mayo + herbs is a quick fix. The cheeses can be swapped too—provolone or pepper jack add extra flavor. Want more heat? Add a dash of cayenne or red pepper flakes to the buffalo sauce. For the dough, if it’s too sticky, just knead it a few times—no need to stress. And if you’re prepping ahead, toss the breaded chicken in the fridge for up to 2 hours before baking—it keeps everything crispier.
This pizza is best fresh out of the oven, but leftovers reheat well. Store in an airtight container for 3-4 days—the crust gets soggy after that. For freezing, bake it first, then wrap tightly in foil. Reheats beautifully in a 350°F oven for 10-15 minutes. Pro tip: Brush the crust with olive oil before baking for extra crispiness. Serve with extra ranch and celery sticks—trust me, it’s a game-changer.
Why You'll Love This Recipe
- No-Yeast Nightmare: I swear by this when I’ve had a long day—just roll out the dough, slap on the chicken, and bake. The chicken stays tender because we’re not overworking it; a quick sear in a pan with buffalo sauce before tossing it on the dough keeps it juicy. No waiting for dough to rise, no stress.
- Spicy-Creamy Magic: That tangy buffalo sauce cuts through the cheesy richness like a dream. I double the sauce on the edges for extra kick, then dump both mozz and cheddar on top—it melts into this perfect stretchy blanket. Honestly, the first bite makes me forget about takeout.
- Game-Day Crowd Pleaser: Between us, this is my go-to for game nights or when friends drop by. The dough stretches enough for 6-8 slices, and the chicken fingers make it feel like a restaurant dish without the fuss. Plus, everyone can customize their own—extra hot sauce, ranch, whatever.
- Leftovers That Don’t Suck: Most pizza gets sad the next day, but not this one. The buffalo chicken stays crispy when reheated (microwave with a damp towel, trust me), and the cheeses don’t turn rubbery. I’ll be real—it’s my secret weapon for lazy lunches or a quick dinner when I’m too tired to cook.
Step-by-step instructions for buffalo chicken finger pizza
Here's how to make a crispy, cheesy pizza with spicy chicken fingers you can pull apart.
👨🍳 Step 1: Breading and Frying the Chicken Fingers
Start by pounding the 1.5 lb boneless chicken breast to an even ¼-inch thickness between two sheets of plastic wrap. Cut into 1-inch wide strips for perfect finger-sized pieces. In a shallow bowl, whisk together the 2 whole large eggs, 1 tsp garlic powder, and 1 tsp onion powder until well combined.
Set up three bowls: one with the ½ cup all-purpose flour, one with the egg mixture, and one with the ½ cup panko breadcrumbs. Dip each chicken strip first into the flour, shaking off excess, then into the egg wash, and finally into the panko breadcrumbs, pressing gently to adhere. Arrange the breaded fingers on a plate and let them rest for 10 minutes—this helps the coating stick better when frying.
🔥 Step 2: Cooking the Chicken Fingers
Heat 1 tbsp olive oil in a large skillet over medium-high heat until shimmering. Fry the chicken fingers in batches for 3-4 minutes per side until golden brown and cooked through to an internal temperature of 165°F. You'll know they're done when the edges are crispy and the chicken releases easily from the pan.
Transfer the cooked chicken fingers to a paper towel-lined plate to drain excess oil. Keep them warm in a 200°F oven while you prepare the pizza dough and sauce. If they cool too much, just pop them back in the oven for a minute to reheat—they'll stay crispy while you finish assembling.
🍳 Step 3: Preparing the Buffalo Sauce
In a small saucepan, combine the 2 tbsp butter and ½ cup hot sauce over low heat. Stir gently until the butter melts completely, then add the 1 cup buffalo sauce. Simmer for 2-3 minutes until the mixture thickens slightly and coats the back of a spoon. This sauce should be smooth but still have some bite—taste it and adjust with more hot sauce if you want extra spice.
Real talk: don't skip this step. The butter in the sauce makes it creamy and rich, balancing the heat perfectly. If you're using pre-made buffalo sauce, just heat it gently with the butter to warm it through. Keep the sauce warm while you prep the pizza.
🥘 Step 4: Assembling the Pizza
Preheat your oven to 425°F and line a baking sheet with parchment paper. Roll out the 1 lb store-bought pizza dough on a floured surface to about ¼-inch thickness, creating a large rectangle or circle—this makes it easier to pull apart later. Brush the dough lightly with a little olive oil for extra crispiness.
Spread the warm buffalo sauce evenly over the dough, leaving a ½-inch border around the edges. Sprinkle half of the 2 cups shredded mozzarella cheese and all of the 1 cup shredded cheddar cheese over the sauce. Arrange the cooked chicken fingers in a single layer on top, slightly overlapping if needed. Finish with the remaining 1 cup shredded mozzarella cheese.
🔥 Step 5: Baking to Crispy Perfection
Bake the pizza for 12-15 minutes until the crust is golden brown and the cheese is bubbly and beginning to brown in spots. Here's the thing—you want the crust to be crispy but not burnt. If the edges start browning too quickly, tent the pizza loosely with foil for the last 5 minutes of baking.
Remove from the oven and let it rest for 2-3 minutes before slicing. The cheese will be stretchy and pull-apart perfect, and the crust will be crispy enough to hold up to the spicy chicken. Serve immediately with ¼ cup ranch dressing on the side for dipping—it's the ultimate cool-down for the heat!
Pro Tips For Making Buffalo Chicken Finger Pizza
- CRANK THE BROILER: I learned this the hard way—sliding your pizza under the broiler too early turns the cheese into a sad, greasy mess. Wait until the chicken fingers are fully cooked and the cheese is just starting to bubble, then blast it for 2-3 minutes. You want that golden-brown crust, not a science experiment.
- CUT CHICKEN SMALLER THAN YOU THINK: I used to eyeball it, and half the chicken fingers would end up undercooked or falling apart. Aim for 1-inch chunks—small enough to cook through fast, big enough to hold their shape. Toss them in buffalo sauce before baking so they soak up flavor instead of drying out.
- DON’T SKIP THE MOZZARELA LAYER: I was lazy once and just used cheddar, and the pizza tasted one-dimensional. Mozzarella melts smoother and stretches better, while cheddar adds that sharp kick. Sprinkle half the mozzarella first, then cheddar, then the rest of the mozzarella—it makes a real difference in texture.
- PRESS THE DOUGH FIRST: Store-bought dough is convenient, but it’s also often underproofed. Press it out with your fingers (yes, even if it’s cold) to even thickness—about ¼-inch—before adding toppings. This prevents soggy spots from the chicken and ensures the crust cooks evenly. (Your future self will thank you.)
Troubleshooting this dish
Crust Too Soggy?
If your pizza crust ends up soggy instead of crispy, it’s usually from too much moisture. The buffalo sauce can be the culprit—try reducing it slightly or patting the chicken fingers dry after frying.
I also recommend brushing the dough with a thin layer of olive oil before baking for extra crispiness. Pre-baking the crust for 3-4 minutes at 425°F before adding toppings can help too. 💫
Chicken Not Crispy Enough
If your chicken fingers lose their crunch, you likely fried them at too low a temperature or didn’t drain them properly. Heat your oil to 350-375°F and fry in batches—don’t overcrowd the pan.
After frying, place them on a wire rack (not paper towels) to drain excess oil while keeping them crispy. Keep them warm in a 200°F oven while assembling the pizza. 🔥
Cheese Not Melting Properly
Uneven cheese melting often means the pizza wasn’t hot enough or the cheese was too cold. Make sure your oven is fully preheated to 425°F and use freshly shredded mozzarella—pre-shredded cheese has anti-caking agents that prevent smooth melting.
For extra gooeyness, sprinkle a little extra cheese on top right before baking. 🧀
Buffalo Sauce Too Thin
A runny buffalo sauce can make your pizza soggy. Simmer the sauce longer to thicken it, or mix in 1 tsp cornstarch with a splash of water to create a slurry.
Stir it in and cook for another 1-2 minutes until it thickens. If you’re using pre-made buffalo sauce, reduce it on the stove first before spreading it on the pizza. 🌶️
Pizza Burning Before Cooking Through
If the edges brown too quickly, tent the pizza loosely with foil for the last 5 minutes of baking. This keeps the crust from burning while the center finishes cooking.
Alternatively, bake on the middle rack instead of the top to ensure even heat distribution. I also recommend using a pizza stone or baking sheet for better heat control. 🌡️
Chicken Too Dry
Overcooked chicken is a common issue when frying. Use a meat thermometer to check for 165°F internal temperature—don’t rely on color alone. If your chicken dries out, try brining it for 30 minutes in ¼ cup salt + 4 cups water before breading.
This keeps it juicy even after frying. 💡
Nutrition facts
Frequently asked questions
Can I make this pizza without frying the chicken?
For a healthier version, bake the breaded chicken fingers at 400°F for 15-18 minutes on a wire rack (not a baking sheet) to keep them crispy. Brush with a little olive oil before baking for extra crunch. The texture will be slightly different but still delicious.
How do I make this recipe kid-friendly?
Cut the heat by using ½ cup mild hot sauce instead of full strength, or serve the pizza with extra ranch on the side for dipping. You can also remove the chicken fingers and serve them separately with a side of mild buffalo sauce for kids who prefer milder flavors.
Can I use rotisserie chicken instead of fresh?
Yes! Shred 1.5 cups cooked rotisserie chicken and toss it with ½ cup buffalo sauce (adjust heat to taste). Spread this mixture on the pizza instead of using chicken fingers. For extra texture, sprinkle with ¼ cup crushed panko before baking.
What’s the best way to store leftovers?
Let the pizza cool completely, then store in an airtight container for up to 3 days in the fridge. Reheat in a 350°F oven for 10-15 minutes until the cheese melts. For freezing, bake first, then wrap tightly in foil. Reheats best in the oven to restore crispiness.
How can I add extra protein?
Top with ½ cup cooked bacon bits or ¼ cup crumbled blue cheese after baking for a rich, savory boost. For vegetarian options, swap chicken for chickpeas or mushrooms tossed in buffalo sauce. Just reduce the baking time by 2-3 minutes to prevent burning.